
Before you start
Ref2Set turns a song you love into an arranged, editable Ableton Live set. It runs on your Mac, and your music never leaves it. Under the hood it uses trackscan, an analyser built for exactly this job.
| You need | Details |
|---|---|
| A Mac | A recent version of macOS. |
| Ableton Live | Live 12 Suite. The sets use Operator, Drift and Echo. The Rich sounds option also uses Wavetable, Analog, Collision, Electric, Tension and Meld presets, and several of these are Suite features. A version for Standard is planned. |
| Disk space | Under 1 GB for the app. The optional stem boost adds about 2 GB. |
| A song | An MP3, WAV, FLAC, AIFF, M4A or OGG file up to 300 MB. |
The result is a starting point built from your song's structure, tempo, key and feel. Melodies and patterns are generated fresh, and they're meant to be replaced with your own ideas.
Install and first launch
- Download the app from the website and open the disk image.
- Drag it into your Applications folder, then open it.
- Wait for setup. The first launch sets itself up with a progress bar: it checks your Mac, creates a private workspace, installs the analysis engine and runs a quick self-test. This happens once.
- The console opens in your browser. Everything runs on your Mac, and nothing is uploaded.
Until the app is notarised by Apple, macOS may ask you to confirm it. Open System Settings → Privacy & Security, find the message about the app near the bottom, and choose Open Anyway. We'll show the exact steps with the download.
The packaged app isn't available yet. This guide describes how it will work, and the console screenshots below are from the real working console.
The console at a glance
The console has four stages across the top: your song, analysis, genre and your set. They light up as you go. Below them you choose a song, a genre, and how the set should feel, then press Build.
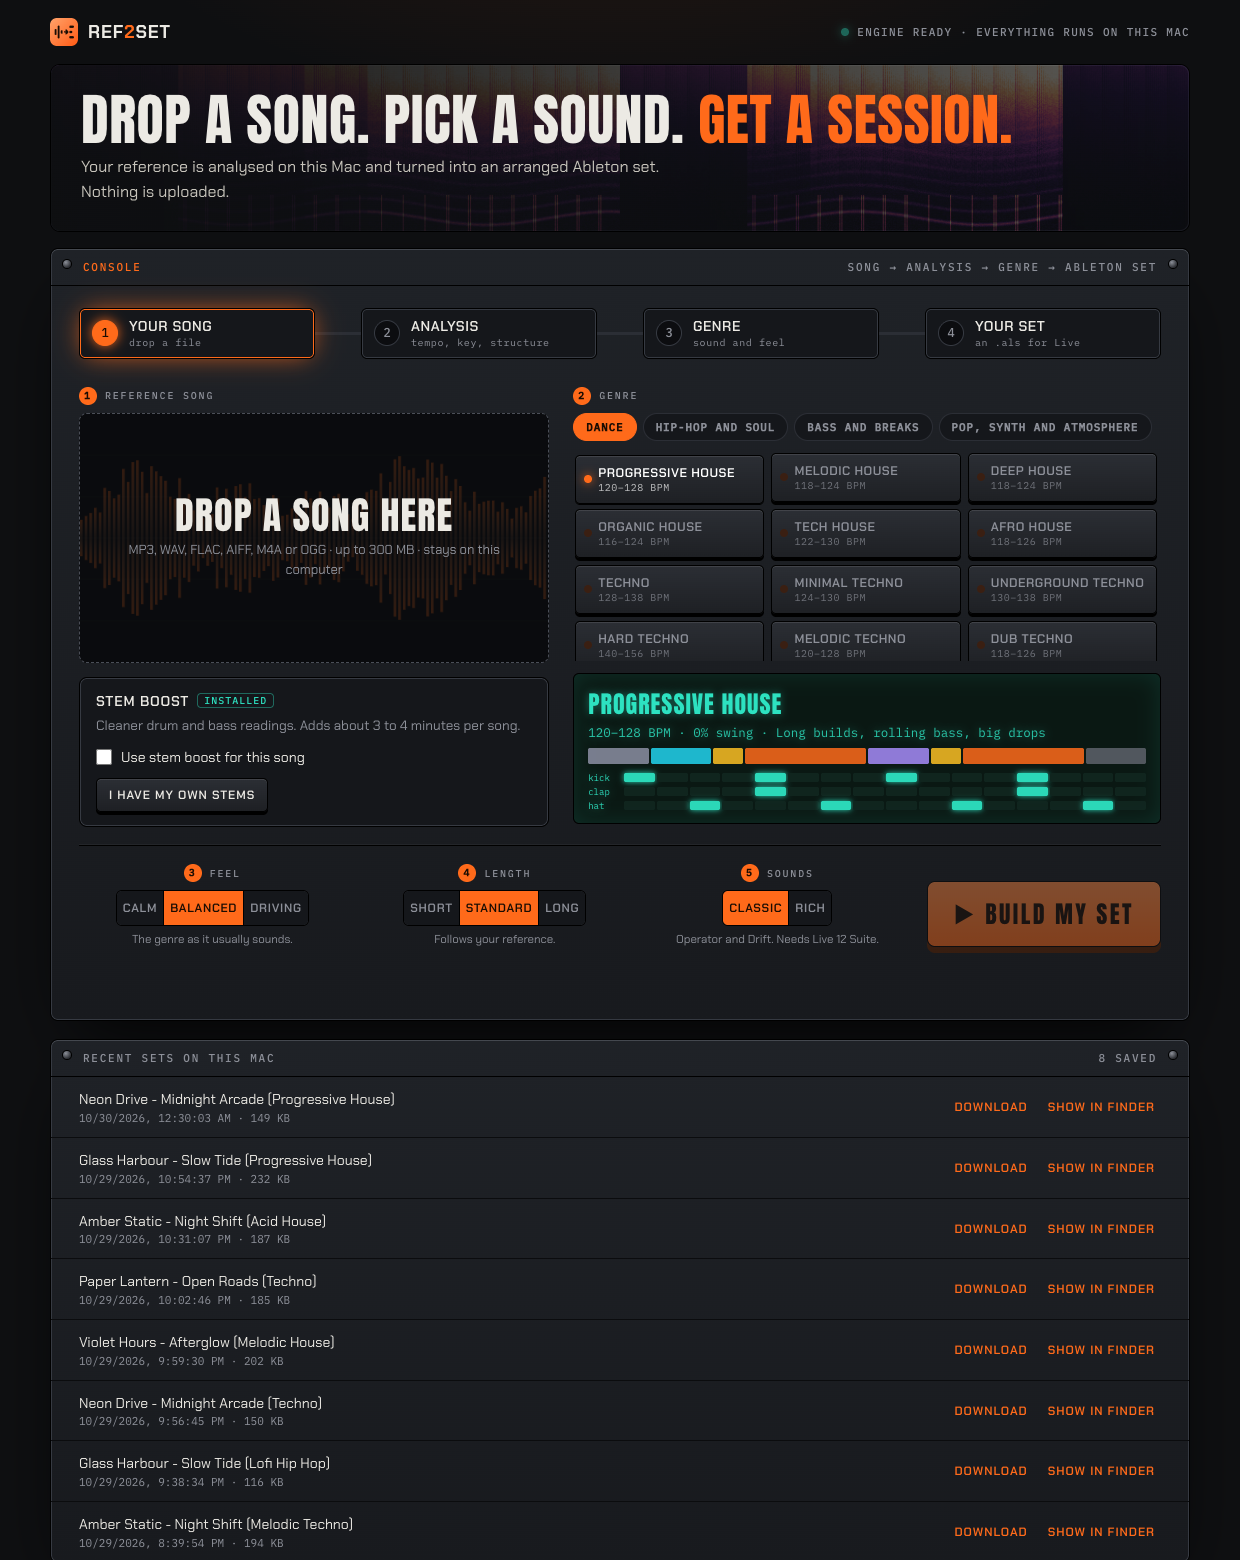
1 · Drop a song
Drag a song onto the large drop area, or click it to choose a file. Pick a track whose arrangement, energy or feel you'd like to start from.

Tips for a good reference
- A clear, steady track reads best.
- Full songs work better than short clips: the app reads the whole arrangement.
- Your song is analysed on your Mac, and the audio is deleted when the job finishes.
2 · Choose a genre
The genre decides the instruments, drum pattern, bass style, chords, mix and automation. There are 32, in four families. Pick a family, choose a genre, and the preview shows its typical arrangement and drum grid.

Each genre has a tempo range. If your song sits outside it, the app maps it to double or half time, or to the closest tempo that fits, and tells you in the notes after the build.
3 · Feel, length and sounds
Three switches shape the set before you build.

| Control | Options |
|---|---|
| Feel | Calm uses sparser parts, softer hits and gentler ducking. Balanced is the genre as it usually sounds. Driving gives busier hats and bass, more energy and a harder pump. |
| Length | Short is about two thirds of your reference's length. Standard follows your reference. Long stretches it by about 40%, always in whole phrases. |
| Sounds | Classic uses Operator and Drift. Rich picks a mix of Ableton's own instrument presets to suit the genre: Electric pianos, Analog keys and leads, Collision mallets, Tension harp and strings, Meld and Wavetable. Some genres also get extra effects such as Roar, Overdrive, Echo or Chorus. Both need Live 12 Suite. |
Optional: stem boost
Stem boost separates your song into drums, bass and everything else before analysing it, so the drum and bass patterns are read more accurately. It's entirely your choice, and everything works without it.

Option A · Install stem boost
- In the stem boost card, read the note, then press Install stem boost.
- Wait for the progress bar. It's a one-time download of about 2 GB.
- When it says installed, tick Use stem boost for this song on any song you like. It adds about three to four minutes per song.
Stem boost uses Demucs. The software is MIT-licensed, but its trained model weights are published for research use, and their licence for other uses is unclear. Installing it is your decision.
Option B · Use your own stems
If you already have stems (from Live 12.3's stem separation or any other tool), you can skip the download.
- In Live, right-click a clip and choose Separate Stems, then export or collect the four stems. Or use any tool you prefer.
- Name the files
drums,bass,otherandvocals. WAV, AIFF and FLAC all work. - In the stem boost card, press I have my own stems, then add all four files.
- Build as usual. The stems are used for this song only and deleted when it finishes.
Build and watch
Press Build my set. A progress screen shows what's happening, and a spectrogram of your actual song paints in as it's analysed. A full song usually takes two to four minutes.

Your result
When it finishes, the console shows your set: the spectrogram of your reference, and below it the arrangement that was built, filling in track by track.

The read-out

- Key, scale and safe notes. Stay on the safe notes and a new melody will fit.
- Chord loop. The progression the set is built on.
- First big moment. Where the first drop or lift lands, by time and bar.
- Loudness. Your reference's level. The set isn't loudness-matched, so mix to taste and raise the master limiter until you're close.
Download .als saves your set. Type the name you want in the File name box above it first, and the file is saved with that name. Show in Finder opens its folder. Blueprint JSON is the plan the set was built from. Every set is also kept in the Recent sets list at the bottom of the console.
Open it in Live
- Save your current work in Live.
- Double-click the .als file, or drag it onto Live.
- Press space to play. Click a section name in the locator bar to jump to it.
You'll find groups for drums, bass, music and FX, four return tracks (a tempo delay, a hall reverb, a room and a dub echo), a master chain with a limiter, section locators along the timeline, and automation lanes. Press A in Live to show automation, then choose a parameter on a track to see its lane.
The sets use devices that Ableton includes in Live 12 Suite. If you have a different edition, some devices may not load. A version for Standard is planned.
Make it yours
- Swap the sounds. Drag any instrument from Live's browser onto a track. The MIDI notes stay.
- Rewrite one chord. Open a Chords clip, change a chord, and nudge a note by a semitone to hear the mood shift.
- Write a new lead. The lead is a placeholder. Replace it with your own melody on the safe notes.
- Redraw automation. Pick the filter on the Arp or the Lead and draw it by hand.
- Rearrange. Drag sections around, delete what you don't need, and add your own ideas on top.
Troubleshooting
| Problem | What to try |
|---|---|
| Live shows a device error | Check you're on Live 12 Suite. Operator, Echo and the Rich-mode instruments (Wavetable, Analog, Collision, Electric, Tension, Meld) are Suite features. Try the Classic sounds option if one fails to load. |
| macOS blocks the app | Open System Settings → Privacy & Security and choose Open Anyway. |
| Something went wrong | Press Copy details on the error screen and send it along. It includes everything needed to fix it. |
| The key or chords look wrong | Chords from a full mix are the hardest thing to read. Try stem boost, or just change them in Live. The notes in the build tell you when the app wasn't sure. |
| The set sounds basic | It uses Ableton's own synths on purpose. Try the Rich sounds option, then swap in your favourite instruments. |
| It's taking a long time | A full song takes two to four minutes, plus three to four more with stem boost. The progress bar names every step. |
Glossary
| Term | Meaning |
|---|---|
| .als | An Ableton Live set file. |
| trackscan | The analysis engine inside Ref2Set. It reads a song's tempo, bar grid, key, chords, bass, drums, sections and loudness. |
| Spectrogram | A picture of a song over time: low sounds at the bottom, high sounds at the top, louder as brighter. |
| Sidechain | Making one sound duck under another, usually the music ducking under the kick for the "pump". |
| Return track | A shared effects channel, such as reverb or delay, that other tracks send some of their sound to. |
| Automation | Parameter changes drawn over time, like a filter slowly opening. |
| Stems | A song split into parts: drums, bass, everything else and vocals. |
| Locator | A named marker on Live's timeline, used here for each section. |